The Amulet of 49

wpid-IMG_20130612_070449.jpg

The Amulet of 49

Have you ever had a person in your life who drains your energy? Injects negativity? Warps, manipulates, and twists your heart and mind in torturous ways? Obviously the best answer is to stop associating with him or her. But there are some people you just can’t avoid. Like people at work, members of clubs or organizations to which you belong, relatives, and so on.

I have a person like this.  So I made an amulet to protect me.   I call it the Amulet of 49.

Why 49?  Because 4 is the number of safety (think four walls, like a castle), and 9 is the perfect holy number (the Trinity of Trinities, 3 x 3 = 9).  7 is the lucky number, and 49 is its square.  4 + 9 = 13 which to me symbolizes the whole year (13 moon cycles) and I want this to protect me year-in and year-out.  Note that, using the usual number reduction method,  13 = 4 (again, the safety number).  Overall, I thought 49 did a good job of summing up what this amulet is all about.

And here’s how I did it.

(Note: If you don’t have the tools and equipment to make the medal as described below, there’s certainly nothing wrong with purchasing a charm or medal instead.  If you go to the trouble of making though, I think most workers would agree that it will have more power.  If you buy one, skip to the “Charging the Amulet” section.)

Constructing the Amulet

WARNING: Always wear safety goggles and beware heat and flame!

image

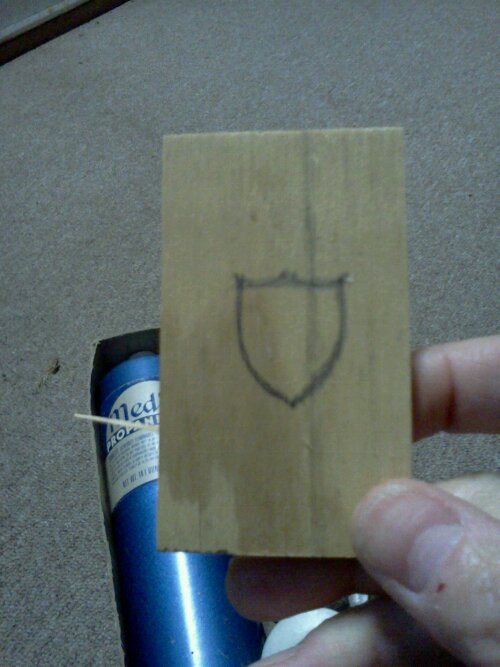
Step 1. Draw the outline of a shield on scrap of wood.

image

Step 2. Carve out the shape about 3/16″ deep.  Dampen the wood so that it won’t go up like a match when the torch hits it.

image

Step 3. Twist a bit of wire into a loop and lay it in the mold (I stripped the plastic from a twist-tie). This will embed a threadable eye so you can put your amulet on a cord or chain around your neck.

image

Step 4. Using LEAD FREE solder, cut enough snips to roughly fill the mold.

image

Step 5. Using a torch, heat the solder until it pools. Make sure you have a cup of water nearby in case the wood catches fire. If the wood is damp it should only scorch.

image

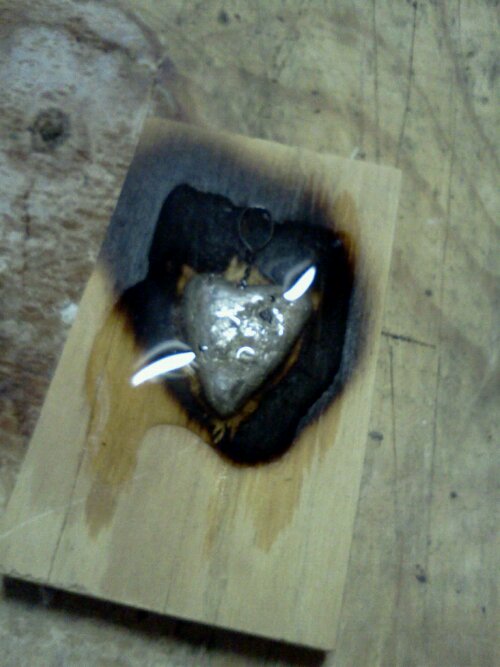
Step 6. Pour on a little water on to quench the metal. Allow to cool before handling.  See how the wire is  imbedded in the amulet?

image

Step 7. Use sandpaper to flatten, smooth, and clean up the amulet.

image

Step 8. Engrave, punch, carve or write the number “49” on the amulet. I have metal punches so it was easy (you can see them on the right).  There was a little black bubble in the metal. It made the shield look like a wounded heart, which is kind of what I’m trying to protect against.  So I thought it was kind of cool.

Charging the Amulet

With the amulet constructed and ready to bless, consecrate, and charge, choose the right day (and hour if you desire) and set up your altar space.

wpid-IMG_20130612_061757.jpg

The altar space I set up for this working.

I chose a Wednesday for personal reasons.  Saturday would be a good day, or even a Sunday.  Consult a good correspondence table and select the day you think seems most fitting.

Set up three candles.  White in the rear (for purity), purple on the left (for power) and blue on the right (for strength and calm).  Bless and dress your candles.  Some folks are really particular about this.  I use Ray Buckland’s method.

Get out your salt, water, oil, and of course incense.  I used Frankincense because it felt right, I have plenty of it, and to me its the “when in doubt” choice that suffices for most anything.

Decorate your altar.  Make it powerful and attractive.  I made a nest of Rosemary to chase away evil spirits and create an air of purity.  That leg bone you see in front is from a buck — a powerful symbol of strength.

When you’re ready to begin, open the space with a few words to chase away any negative influences.  As I light the candles I bless each direction with a call to the ruling Archangel (Uriel in the North, Michael in the East, Raphael in the South, and Gabriel in the West) and ask them to watch over the area and bless the work.

Light the incense.  Place your hands over the amulet and recite the following incantation:

“Wherever I go, whomever I meet,

There is nothing from which

You can’t protect me.”

Recite it over and over, keeping a regular cadence.  As you do so, visualize yourself being immune to the negative effects you want to be protected from.  Imagine the joy you will feel knowing that you can’t be drained, influenced, or emotionally harmed while this amulet is around your neck.  Actually cry tears of joy if you are able.  Keep at it until you can feel your hands growing warm, until you know it’s done.  Knowing when the amulet is charged is like knowing when you’re in love.  You just do.

Next bless the amulet with the salt (Earth), pass it through the white candle flame (Fire), wave it through the incense smoke (Air), and sprinkle it with water (Water) — the four elements.  Each time you should say some like, “With this _____ (salt, candle flame, etc.) I bless and consecrate you with  ____ (Earth, Fire, etc.).”

Next anoint the amulet with oil saying something like, “I hereby bless, consecrate and charge this amulet for my protection, that it may serve me well; that it may protect me, shield me, and keep me from harm.  By my will and by my might it is so.”

If you called upon the Archangels as I did, thank them for their aid, light some incense for them, and send them on their way.  I use something simple like, “Thank you for your blessings, as I send mine in turn to you; let us part now in peace until we meet again.  Farewell.”

Place the amulet back in the center of the altar and let the incense burn down before removing it.  Sit quietly, contemplate your work, and enjoy the moment.

Make something nice to hold the amulet.  I placed some of the Rosemary from the altar into a small box, then hot-glued in place a cloth liner (that’s the box you see in the picture at the top).  Respect the amulet and treat it like the living protector that it is.

Don’t wear it at all times.  Keep it where you can easily get to it, like a purse, bag, or briefcase.  Put it on before a scheduled meeting with a troublesome person and put it away when it’s over.  This will have the benefit of  hitting your mental switch and sending the signal to your subconscious that a change is taking place — that you will not be affected by this person.  You want your brain and the amulet working as a team!

I tried the amulet for the first time on Wednesday and it performed beautifully.

Counterpunching Drills

The guys and I put together a few videos illustrating some of our favorite counterpunching drills.  Check them out on youtube.

Jumprope AFAYC 10 mins; 1/2 Pyramid to 7

Jumprope AFAYC 10 mins; 1/2 Pyramid to 7 w/ 20# vest: Pullups, Jump Squats, Pushups, Squats @cabal_fang #WOD

What Your Blog Means to Me: Moma Fauna

I spent over a year working on a project called In the Drip of an Eave.  It didn’t sell very well.  Some time later I decided to go and see if anybody had blogged about it.  I did a little search and something came up on a blog called Pray to the Moon.

A blogger named Moma Fauna had made an off-hand remark that she was reading to her child from the little book of fairy-tales I had written and included in the kit she bought from me.

I was deeply touched by the image of a mother and child reading together from something I wrote and illustrated.  If you don’t have kids you probably don’t get it.  I mean look, parents insulate their kids from junk, and they only share things with their kids they feel are good.  Suddenly I saw that my art has a spirit of its own, that it seeps into the world like water, that it’s bigger than me.  She doesn’t even know it, but her one little comment might be the high point of my career as a writer to date.  It made me feel simultaneously proud and humble.  It still makes me want to be a better writer and a better pagan.

I explored her blog and found out that there’s a reason why she won the Pagan Pages Blog Hop award back in May 2012.  She is smart, articulate, and knowledgeable, and hilarious when she wants to be.  Her blog oozes magic and lore, and the depth and sincerity of her spirituality shines out in detailed and engaging posts.  Hers is not a blog by someone futzing around with earth-based spirituality or pretending to be something — it’s the blog of a fully-invested animist picking her own path and living it every day.

Moma, I read every post you write.  I send to you and your family all the brightest blessings.

Random Workout Generator

image

1.5″ wooden blocks made into dice to create random workouts

Random workouts are a fun way to shake things up.

They’re a particularly cool idea for martial artists.   If you want to be ready for anything real life throws at you, try throwing unpredictable stuff at yourself in the gym.

I have two dice — one for Skills, the other for Fitness.  I roll both dice, warmup for ten minutes, then practice whatever the Skills dice says, followed by whatever the Fitness dice says.

My Skills dice has Heavybag, Knife, Cane, Kicks, Shadowboxing, and Wrestling on it, while my Fitness dice has Constitutional (twice), Hiking, 10-Min Max Output, Pyramid, and Sprints on it.

You can get wooden blocks at a craft store, or you could steal a set of dice out of that old Milton Bradley game in the back of the closet and put stickers over the dots.  Hobby shops specializing in games used to sell blank dice, but I haven’t been in one in awhile so I’m not sure they still do.  If you can’t find a way to make dice do something else.  Doesn’t have to be dice…you could just as easily put scraps of paper in a fishbowl and make a workout raffle, or write on ping-pong balls, put them in a cage, and play workout Bingo.

How you do it doesn’t matter. The point is that introducing some randomness into your workouts is a great thing.

8 rounds: Heavybag 2 mins AHAYC, 1 min S

8 rounds: Heavybag 2 mins AHAYC, 1 min Squats AMAYC @cabal_fang #WOD

Mini Mud Run

image

Nothing like the concoction that is sweat, rain and mud! Try this:

Full pyramid to 9 of Squats (x2), Pushups, Sprints (10 meters out/back). That’s 162 Squats, 81 pushups, 81 Sprints. Get it done in under 20 Minutes (my time 18:58)

Minimal Shoes – The Science and the Mysticism

Update 7/28/19: I just noticed that scads of people are still reading my pre-Achilles-injury posts from years ago.  I’m no longer in minimal shoes.  In my opinion the whole minimal shoe thing is hocus-pocus.  Shoes were developed and universally adopted because they work better than bare feet.  Do what you want but don’t say I didn’t warn you!  

—————————–

Original post from 6/7/2013

Around town I used to wear boots.  For working out I wore conventional New Balance cross-trainers.  My kids used to cringe whenever at my oft-spoken admonition: “You should be wearing more functional footwear!”  But not more.  I have gone to thinner soles with zero heel-to-toe drop.  I’ll tell you why in a minute.  First the low-down on what I’m wearing.

These days I’m sporting Chuck Taylors pretty much everywhere.  I keep a clean pair for office casual, as well as a pair of brown leather Vivobarefoot shoes.  I also have a pair of Sofstars on order (I’ll put up a review when they get here).  Sofstar looks like a fantastic small shop run by really cool folks.  Who can resist buying a pair of shoes handmade in the USA by elves?

Now for the why.

First, the Science

Raised heels (lifts of 8mm are not uncommon in most shoes and sneakers) shorten the Achilles tendon.  Arch supports weaken the muscles of the feet.  Thick soles destroy ground feel.  Less arch support and increased ground feel allow feet to spread and do the job they were designed to do.  For years I wore a size 8 or 8.5.  I now wear size 9.  Trust me, you want your foot performing maximally.  Feet are marvels of engineering.  Let them do what they do and they’ll make you happy.  There’s a plethora of info available on the science of the barefoot shoe revolution out there, and there are some naysayers.  Here’s a nice overview on the subject if you want to read more.

Runners Beware: There are plenty of studies claiming that running barefoot is a bad idea.  I think some of those studies are pretty well flawed.  Others seem sound.  But since I’m not a runner (short sprints only for me!) none of those bug me much.   If you’re a hard-core runner, think long and hard before making the switch.

And now the Mysticism

When you liberate your feet from rigid coffins of thick rubber and plastic and put them into  slippers of canvas or leather you feel a kind of release.  You walk and run differently, with a bounce in your step that changes your outlook from the ground up.  When you’re outside strolling along the street or trail you’re more in touch with the world around you.  You feel and react to the ground instead of cruising along in a devil-may-care sort of way.

Some folks even believe in “Earthing” — that you shouldn’t have rubber between you and the Earth when walking — natural materials like leather or hemp only.  There may be something to it, but I can’t attest because all my shoes have rubber soles.

For centuries being barefoot was a sign of slavery.  Slave codes mandated that slaves go barefoot.  But that’s the “shoe-centric” view.  In actuality, barefoot = freedom.  Going completely barefoot can literally be a religious experience.  If you wear minimal shoes in public, you can go barefoot in private — completely — without fear of developing Plantar fasciitis .  Been there, done that.  PF sucks.  Trust me, you don’t want it.   That’s why you should…

MAKE THE TRANSITION VERY SLOWLY OR YOU WILL HURT YOURSELF.

I’m not kidding.  I took over a year to make the move and still had a few rough spots (probably due to my stiff old 50+ body).  Start by replacing the arches in your existing shoes with lower ones every few months until you have no arch support in your shoes.  Every now and then rip some of the crap out of the inside of your shoes until you’re down to the actual sole.  Then move to lower and lower heels.

I found that doing this with all my shoes at the same time was the key.  Where I experienced problems was when I was trying to go zero-drop in my workout shoes while wearing traditional dress shoes with heels to the office.  All day long my Achilles was shortening.  Then, when I went to exercise I was over-stressing my Achilles tendon.  It’s the same problem folks have who wear high heels every day.  I strained my Achilles and it took me 6 months to rehab it.  I’ll say it again: go slowly and make the switch with all your shoes at the same time.

And a final note.  Don’t be stupid.  If you’re working in the yard, carrying heavy objects, operating power equipment or tools,  banging around a warehouse or machine shop, etc. protect your feet with a substantial shoe.  I still have my boots, I just had them re-soled to about a 2mm drop.  That worked because they were only 4mm to start with.  That won’t work with a pair of boots with a huge heel on them, it’ll just wreck the shoe.  OTZShoes makes a zero drop boot, but it’s kind of pricey.


Jumprope 10 mins; 25 Pullups, 50 Jump Sq

Jumprope 10 mins; 25 Pullups, 50 Jump Squats, 50 Pikes @cabal_fang #WOD

Update: “The 14th Mansion”

Writing Progress 130528I was supposed to be done with the next book — “The 14th Mansion” — by 5/15 and I’m not.  I let things interfere, and that was dumb and regrettable.

But I’m not looking back.  New goal is to be done by July 4th.  About 25,000 words left, give or take, then the editing part comes.

Sorry guys, release date is probably going to be September/October instead of July.